How to Add Natural Search Filters to Your Search Queries
Adding natural language search to your website can boost visitor engagement and experience, which in turn drives sales.
In this article, we’ll show you three examples of how to add NLP-like capabilities to your search bar. Visitors to your website will be able to use natural terms to filter results instantly. The three examples we’ll show include:
Price filters
“Cheap” discount filter
Gender filters
The power of pipelines
With Search.io pipelines, it’s actually quite easy to add natural language search. We introduced pipelines in 2019 as a whole new way to configure search with YAML. Pipelines enable you to build highly sophisticated features in minutes — what can take days or weeks to configure with other search engines.
Pipelines define a series of steps that are executed sequentially to produce an outcome. There are two types of pipelines:
Indexing pipelines are executed at index time, and update and augment information.
Query pipelines are executed at query time, and construct highly complex and effective queries from a series of steps.
In the case of natural language queries, we’ll be using query pipelines. Check out our docs for a more complete overview of pipelines.
Let’s dive in.
Price filters
People often shop for items based on price. Rather than making visitors narrow results after the query, what if you could save them that step by filtering from the search query itself?
It’s not hard to do, and by making your search more user-friendly, it can turn visitors into customers.
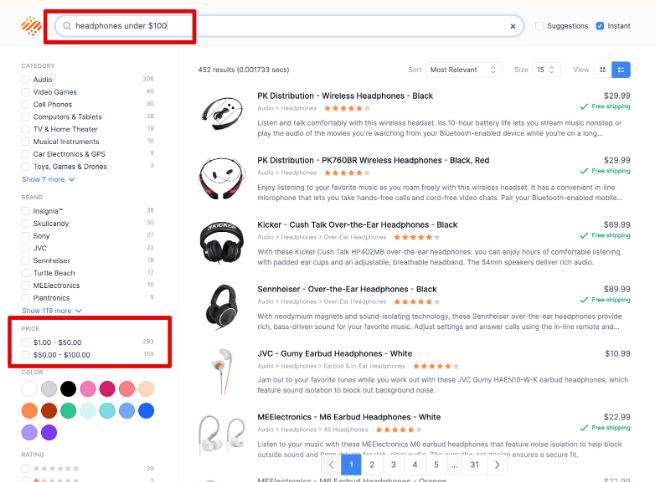
In the screenshot below, you can see that results for “headphones under $100” were delivered as the user types. Additionally, the search facets on the left-hand side of the screen were adjusted to only display filters for items under $100.
Here’s how the pipeline looks:
id: string-regexp-extract
  title: price less than $X
  params:
    match:
      bind: priceFilter
    matchTemplate:
      const: price < ${priceValue}
    outText:
      bind: q
    pattern:
      const: under (\$|£|)(?P<priceValue>\d+)
    text:
      bind: q

id: add-filter
  title: low price
  params:
    filter:
      bind: priceFilter
condition: priceFilter != ''The first step is looking for a pattern to match — the price under a dollar amount — which it then pulls from the query. The price is an attribute stored on the product record. A subsequent step then uses the extracted information to build a filter. Of course, this will only run if the priceFilter condition is met.
It can also be re-used for personalization; if you know a customer tends to purchase items that are low, mid, or high-priced, you can use that for personalization and recommendations.
Voila, you now have a price filter!
“Cheap / discount” discount filters
Rather than a dollar amount, what if customers could search more broadly. For example, you can add a filter that allows customers to search for “cheap sweaters” or “discount headphones” to find discounted items quickly.
There are two ways to do it. One is to create Gmail-like filters that use a special search operator, and the other is to boost results that match the condition.
This example uses search operators to filter results from the query. Alternatively, you can boost terms that contain the keyword "cheap".
Using Gmail-like search operators
In the first instance of creating Gmail-like operators, the logic here only requires the simple addition of two pipeline steps:
id: string-regexp-extract
title: gmail style in:tag-name style filters
params:
  match:
    bind: in
  matchTemplate:
    const: ${inValue}
  outText:
    bind: q
  pattern:
    const: in:(?P[a-zA-Z_\-]+)
  text:
    bind: q
id: add-filter
title: in:cheap
params:
  filter:
    const: price_range = '1 - 50'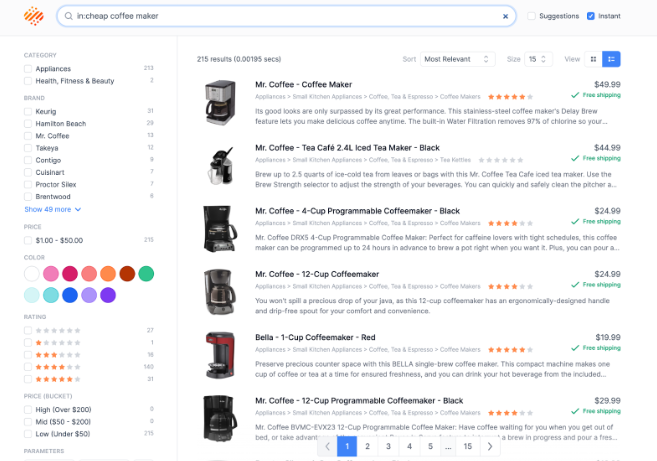
condition: in = 'cheap' These two steps sequentially perform two functions:
The “in:<match>” pattern is used to look for the Gmail style filters. The “match” is transferred to a new pipeline param called “in”.
A filter is added to look for the situation where in = “cheap”. If this occurs then a filter is added to the query to filter out things that are not cheap!
In the example, we used the search operator “in:cheap” to filter the query. Alternatively, you can create a boost to work on the phrase “cheap” without the additional operator. Let's see how that's accomplished.
Boosting on keywords
Another way to provide natural language search using keywords is to extract the word “cheap” (or “low cost” or “discount” etc.) from the query. Rather than filtering, we can apply boosts. So if the query contains cheap, we will apply a boost to records within a price range.
First, we want to detect if the query contains those terms. We can do this with the following step:
- id: string-regexp-extract
  params:
    match:
      bind: cheap
    matchName:
      constant: cheapVal
    outText:
      bind: q
    pattern:
      constant: (?P<cheapVal>(?i)\b(lower price|low price|lowest price|lowest
        prices|cheap|cheaper|cheapest|discount|discounted)\b)
    text:
bind: qThis checks for any of those terms then extracts it and stores it in a variable called cheap. If the query is 'cheap TV' this transforms the query to just 'tv' by extracting cheap.
We then apply a boost to products within a certain price range. We can do that with the following step:
- id: range-boost
  params:
    end:
      constant: "0"
    field:
      constant: price
    score:
      constant: "0.4"
    start:
      constant: "100"
condition: cheapThis will only run if the variable cheap (note the condition at the end of the step) is present. Because cheap is present, then the boost will run. The boost applies a small ranking lift to products within the 0 - 100 price range, giving products at the lower end of the range a higher boost than the upper range.* If it was inverted then it would have the opposite effect.
Small detail worth noting... if you specify values from 0 - 100, results will be displayed with the highest priced items at the top. Instead, you could write it as 100 - 0, which pushes lower cost items higher up in results!
Read more in our knowledge base about adding pricing or Gmail-like search operators to your search bar.
Gender filters
In the very first example above, we demonstrated using pipelines for price filters. It works in a similar way for gender, size, location, or any other attribute.

In this case, the pipeline step is very straightforward and looks for any mention of the gender term. It recognizes if a visitor adds men/mens/women/womens to a query. The search engine will also work with the possessive form, men’s and women’s, without the need to write additional logic.
- id: string-regexp-extract
  title: extract gender values
  params:
    match:
      bind: genderFilter
    matchTemplate:
      constant: ${genderValue}
    outText:
      bind: q
    pattern:
      constant: (?P<genderValue>(?i)(womens|women|mens|men))
    text:
bind: qThen we need to apply the filter on a search:
- id: add-filter
description: filter on gender
params:
filter:
bind: genderExtract
condition: genderExtract != ''The information of whether a product is men’s or women’s is stored in the 'gender' field on record. So what's happening here is the customer is passing in something called 'genderFilter', which will equal 'men', 'mens', 'women' or 'womens'. If any of those conditions are met, we will set a filter accordingly on the results set.
Read more about adding keyword-triggered filters and boosts to your site.
Working with pipelines
Pipelines can be edited and saved under Relevance settings in the Search.io console. Every time you make changes to a pipeline, you’ll be prompted as to whether to save the changes as a new version. You can easily roll back to previous versions or even A/B split test different pipelines to determine which one provides the best results for your visitors.
